使用树莓派进行红外信号的接收&发射

通过树莓派的 gpio 接口接入红外接收器以及红外发射器,可以实现红外信号的接收和发射功能.

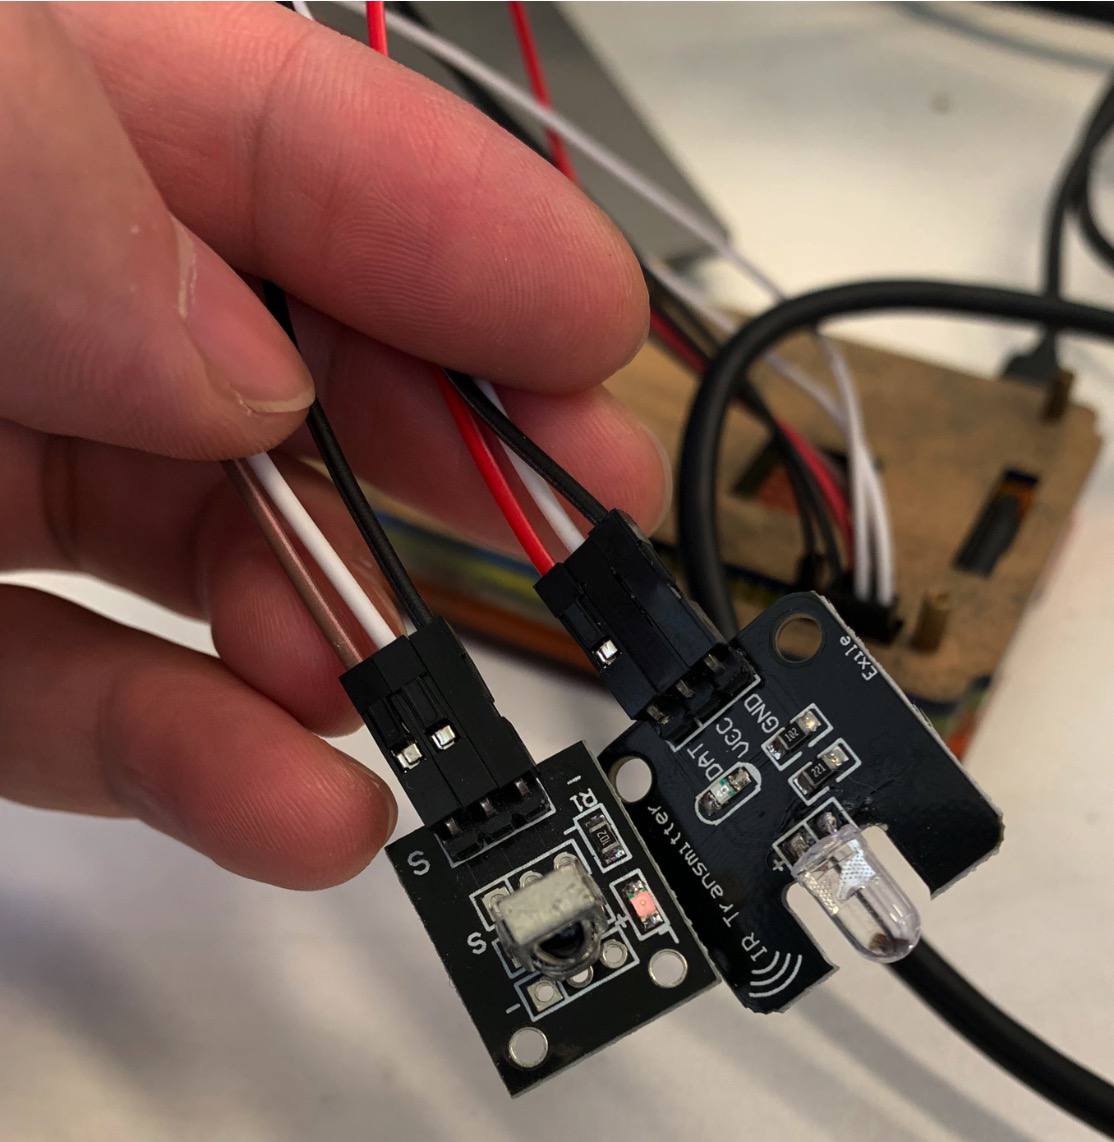
img

img

安装 lirc

配置驱动

使用 pinout 命令查看树莓派管脚:

1
2
3
4
5
6
7
8
9
10
11
12
13
14
15
16
17
18
19
20
21
22
23
24
25
26
27
28
29
30
31
32
33
34
35
36
37
38
39
40
41
42
43
44
45
46
47
48
49
50

pi@raspberrypi:~ $ pinout
,--------------------------------.
| oooooooooooooooooooo J8 +====
| 1ooooooooooooooooooo | USB
| +====
| Pi Model 3B V1.2 |
| +----+ +====
| |D| |SoC | | USB
| |S| | | +====
| |I| +----+ |
| |C| +======
| |S| | Net
| pwr |HDMI| |I||A| +======
`-| |--------| |----|V|-------'

Revision : a22082
SoC : BCM2837
RAM : 1024Mb
Storage : MicroSD
USB ports : 4 (excluding power)
Ethernet ports : 1
Wi-fi : True
Bluetooth : True
Camera ports (CSI) : 1
Display ports (DSI): 1

J8:
3V3 (1) (2) 5V
GPIO2 (3) (4) 5V
GPIO3 (5) (6) GND
GPIO4 (7) (8) GPIO14
GND (9) (10) GPIO15
GPIO17 (11) (12) GPIO18
GPIO27 (13) (14) GND
GPIO22 (15) (16) GPIO23
3V3 (17) (18) GPIO24
GPIO10 (19) (20) GND
GPIO9 (21) (22) GPIO25
GPIO11 (23) (24) GPIO8
GND (25) (26) GPIO7
GPIO0 (27) (28) GPIO1
GPIO5 (29) (30) GND
GPIO6 (31) (32) GPIO12
GPIO13 (33) (34) GND
GPIO19 (35) (36) GPIO16
GPIO26 (37) (38) GPIO20
GND (39) (40) GPIO21

For further information, please refer to https://pinout.xyz/

启用 ir 管脚:

1
sudo vi /boot/config.txt

并找到如下内容:

1
2
3
# Uncomment this to enable infrared communication.
#dtoverlay=gpio-ir,gpio_pin=17
#dtoverlay=gpio-ir-tx,gpio_pin=18

把下面两行注释掉

lirc使用BCM编号方式,先确定自己要使用那个GPIO针脚,这里使用17作为接收,18作为发送。

1
2
3
4

dtoverlay=gpio-ir,gpio_pin=17

dtoverlay=gpio-ir-tx,gpio_pin=18

其中第一行代表红外信号输入,对应树莓派 gpio17 接口,
第二行代表红外信号输出,对应树莓派 gpio18 接口.

完成这一步修改以后需要重启树莓派.

重启以后 ls -l /dev | grep lirc应该可以看到 lirc0 和 lirc1 两项:

1
2
crw-rw----  1 root video   251,   0 10月 29 14:52 lirc0
crw-rw---- 1 root video 251, 1 10月 29 14:52 lirc1

根据官方给出的说明:

Please note that in Raspbian Buster with LIRC 0.10 device /dev/lirc1 is the receiver and device /dev/lirc0 is the transmitter. Initially /dev/lirc1 in /etc/lirc/lirc_options.conf is used to scan a remote control. After that the configuration has to be updated to /dev/lirc0 in order to send infrared commands. LIRC has to be restarted after a change in /etc/lirc/lirc_options.conf/.

lirc0 是输出源(外接红外信号发射器),lirc1为输入源(外接红外信号接收器),这个信息 很重要!,后面在配置的时候会用到.

安装 lirc


1
2

sudo apt install lirc

接着编辑 /etc/lirc/lirc_options.conf 文件中的一下内容为:

1
2
3

driver = default
device = /dev/lirc0

这里需要注意的是,device 设置为 /dev/lirc1 意味着我们现在是要进行信号的录入.进行到信号输出时需要把 device 修改为 /dev/lirc0,并且每次修改 以后,都需要重启 lirc 服务:

1
2
3
4
5
6
7

# 关闭 lirc 服务
sudo systemctl stop lircd

# 重启 lirc 服务

sudo lircd -d /dev/lirc0

查看 lirc 启动信息:

1
service lircd status

接收

执行:

1
2
3

mode2 -d /dev/lirc1
# 如果权限不够可能需要加上 `sudo`

接着用遥控器对准红外接收器按按钮,就可以看到 类似下面的输入:

1
2
3
4
5
6
7
8
9
10
11
12
13
14
15
16
17
18
19
20
21
22
23
24
pulse 1075
space 520
pulse 630
space 1110
pulse 659
space 512
pulse 659
space 804
pulse 629
space 1112
pulse 634
space 536
pulse 653
space 515
pulse 655
space 1372
pulse 653
space 518
pulse 657
space 513
pulse 654
space 1086
pulse 658
pulse 130755

使用:

1
2
3
4

mode2 -m -d /dev/lirc1

# 如果权限不够可能需要加上 `sudo`

来获取 raw 格式的输入信号:

1
2
3
4
5
6
7
8
9
10
11
12
13
14
15
16
17
18
19
20
21
22
23
24
Using driver default on device /dev/lirc1
Trying device: /dev/lirc1
Using device: /dev/lirc1
16777215

1048 543 630 1111 630 539
657 803 631 1111 631 540
631 537 659 807 653 806
656 1084 660 1366 657 12530

1050 552 624 1111 655 516
630 830 631 1113 632 539
654 515 656 804 655 806
631 1111 660 1366 629 12557

1051 546 630 1110 656 516
654 808 628 1112 629 540
628 542 628 834 653 808
655 1085 659 1368 631 12556

1079 517 656 1086 630 538
630 830 655 1089 629 539
655 515 656 804 633 831
655 1086 653 1374 656 133770-pulse

发射

参考了这篇文章:

https://segmentfault.com/a/1190000014135418

模板文件获取

cd 到 /etc/lirc 下进行模板文件生成:

1
2
3
4
5
6
7
8
cd /etc/lirc


irrecord -f -d /dev/lirc1 --disable-namespace

# 加上 --disable-namespace 可以自定义按键的名称

# 然后按照指示操作即可

生成如下的格式:

1
2
3
4
5
6
7
8
9
10
11
12
13
14
15
16
17
18
19
20
21
22
23
24
25
26
27
28
29
begin remote

name aircon
flags RAW_CODES
eps 30
aeps 100

gap 19991

begin raw_codes

name on
9042 4438 700 1602 705 526
678 528 681 531 674 527
679 528 679 528 677 527
677 528 679 528 678 528
677 1632 676 529 676 531
676 531 649 556 672 532
650 558 654 552 652 553
649 558 648 1661 650 558
648 558 648 1661 649 562
644 558 647 558 648 1657
651 558 647 1659 650 557
653 553 648 1660 648 557
649

end raw_codes

end remote

name on以及下面的数字是 按钮on 对应的红外码.

gap 是程序计算出来的你的遥控器的参数.

修改模板文件

后面的步骤就是重复 mode2 -m -d /dev/lirc1 记录不同的按键对应的红外码,开头和结尾很大的数字要去除掉.

生成的文件格式:

1
2
3
4
5
6
7
8
9
10
11
12
13
14
15
16
17
18
19
20
21
22
23
24
25
26
27
28
29
30
31
32
33
34
35
36
37
38
39
40
41
42
43
44
45
46
47
48
49
50
51
52
53
54
55
56
57
58
59
60
61
62
63
64
65
66
67
68
69
70
71
72
73
74
75
76
77
78
79
80
81
82
83
84
85
86
87
88
89
90
91
92
93
94
95
96

begin remote

name aircon
flags RAW_CODES
eps 30
aeps 100

gap 19991

begin raw_codes

name on
9059 4432 706 1604 706 528
679 524 681 1603 703 526
680 1602 715 1596 704 526
679 527 679 527 680 527
679 1604 705 530 673 530
674 529 682 529 675 530
674 532 674 532 650 557
648 556 654 1653 676 533
649 559 647 1667 639 559
648 558 656 553 647 1658
648 558 650 1659 649 559
647 559 648 1659 648 558
646 19991

648 558 648 558 650 567
638 557 648 1668 640 557
649 558 650 558 646 1660
650 556 649 557 649 559
654 552 648 1657 651 558
647 554 660 549 649 559
647 557 649 559 648 559
647 557 644 561 648 559
648 556 647 560 648 556
652 563 642 1658 648 1661
649 1660 646 1658 650

name off
9029 4432 715 1594 706 526
682 523 681 525 680 526
681 1601 708 1607 699 524
688 519 682 526 678 527
681 1601 708 524 687 520
682 525 677 527 677 529
675 531 676 531 674 532
651 558 646 1659 650 557
648 557 650 1659 653 554
650 559 647 558 649 1657
649 558 648 1661 648 557
646 562 645 1666 643 558
649 19992

651 555 650 558 648 562
645 557 648 1661 653 552
646 560 650 557 648 1657
649 561 647 557 647 558
650 556 650 1659 649 559
647 557 649 558 648 559
647 557 651 564 642 559
646 557 649 557 657 552
647 557 648 558 650 557
645 560 653 1653 646 1661
650 1659 648 558 647

name 26C
9026 4430 705 1604 706 528
679 535 670 1604 705 527
675 532 679 1607 702 530
673 531 683 1625 672 535
672 1633 676 530 673 534
649 558 648 563 642 556
651 556 650 558 672 532
649 556 652 1659 648 558
656 551 646 1659 650 558
648 558 648 558 649 1658
649 561 648 1659 647 559
650 556 648 1660 646 559
647 19990

648 1659 649 558 648 558
647 558 650 1658 650 557
650 555 650 558 648 558
649 555 652 561 667 534
648 559 648 1658 656 550
650 557 672 533 649 555
650 559 649 558 647 559
648 558 648 566 641 558
647 558 648 558 650 558
648 558 648 1660 646 558
648 558 646 562 647

end raw_codes

end remote

最后,把配置文件复制到指定目录 /etc/lirc/lircd.conf/ 并重启lircd服务:

1
2
sudo cp aircon.lircd.conf /etc/lirc/lircd.conf.d/
sudo service lircd restart

发射信号

1
irsend SEND_ONCE aircon on

后记

空调遥控器每个按钮代表的是一个场景,而不是修改状态的一个步骤.举个例子,当前空调的状态是制热 25 度,我按下了温度+1 的按钮,并不是单纯的温度+1 的指令,而是把空调调整到 制热 26 度的状态.因此我们无法简单地录制温度+1 的指令.每个温度都需要录制单独的状态.

由于树莓派版本/传感器版本/lirc 版本不同,实现的过程也会有很大的不同,如果遇到问题可以发邮件给我,我们一起讨论.

thank u !